
There are multiple solutions for adding extra languages to a Laravel website. For example:
Locale prefix after the domain
E.g.: https://yoursite.com/en/, https://yoursite.com/de/.
Language is stored in the session
The visitor selects a language from a list. This data is stored in the session and content is displayed accordingly. Not the best solution for SEO.
Using subdomains as language indicators
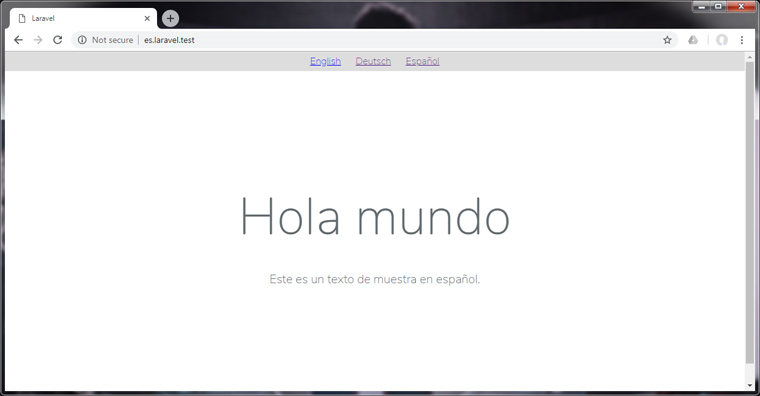
E.g.: de.yoursite.com. This tutorial will cover this method. I prefer this approach because it looks good, it’s optimal for SEO and it can be accomplished in a few simple steps. First we will make it work in our localhost environment and then on a live webserver.
Preparations
Although this tutorial is for XAMPP / Apache users at the moment, you can still take away useful information.
Unfortunately PHP’s built-in webserver (php artisan serve) won’t be enough for our mission. You should have an internal domain pointing to your Laravel project on localhost, e.g.: laravel.test or similar. If you’re on Windows and don’t know how to do that, just follow my How to run Laravel on Windows with XAMPP tutorial. If you’re on Mac, you should have a look at Valet.
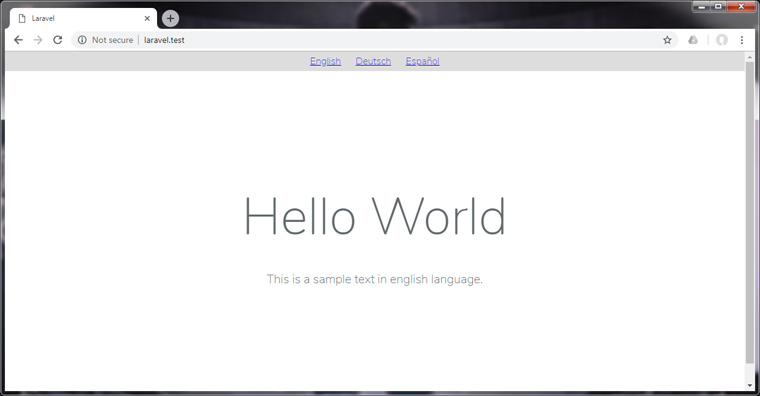
I will use a fresh Laravel install with a slightly modified welcome page and use laravel.test as inner domain. I’ll add german (de.laravel.test) and spanish (es.laravel.test) languages.

Set up your webserver to handle subdomains
Go to Apache’s conf/extra/ directory (e.g.: c:/xampp/apache/conf/extra/) and open httpd-vhosts.conf file. Find the lines where you define your local domain and insert the following code:
<VirtualHost laravel.test:80>
    ServerAlias *.laravel.test
    DocumentRoot "C:/xampp/htdocs/your_project/public"
</VirtualHost>
It tells Apache that if we type any subdomain before our laravel.test domain, it should load the same application. Make sure that DocumentRoot points to your laravel project’s public folder.
We also have to tell Windows to direct all subdomain calls to localhost. Open the hosts file in c:/Windows/System32/drivers/etc/ folder and extend the line where you define the inner domain. Sadly we can’t use a wildcard here, so we have to list every language subdomain:
127.0.0.1 laravel.test en.laravel.test de.laravel.test es.laravel.test
Don’t forget to restart Apache in case it’s already running.
Define available languages for Laravel
Let’s add our extra languages in Laravel’s configuration file, so we can access them later anywhere within our application. Go to your laravel project folder and open config/app.php file. Find the line 'locale' => 'en'. It defines the default language. Create a new locales array and list every language like this:
'locale' => 'en',
'locales' => [
    'en' => 'English',
    'de' => 'Deutsch',
    'es' => 'Español'
],
Create a language middleware
Visit your Laravel project directory in a terminal and run php artisan make:middleware Language
to create a new middleware. Its purpose is to verify language code in
the subdomain. If it’s an existing, valid language, it will set
application locale to that language. In case it’s not a valid language,
it will fall back to a default. Open the newly created Language
middleware (app/Http/Middleware/Language.php) and paste the following
code within the handle function:
public function handle($request, Closure $next){

    // get the subdomain if exists
    $urlArray = explode('.', parse_url($request->url(), PHP_URL_HOST));
    if (count($urlArray) < 3){
        return $next($request);
    }
    $subdomain = $urlArray[0];


    // if it's the default language: redirect to URL without subdomain
    if ($subdomain == 'en'){

        $baseUrl = str_replace('//en.', '//', $request->url());
        return redirect()->to($baseUrl);

    }


    // if it's a valid language, set as locale and set time zone
    if ( array_key_exists($subdomain, config()->get('app.locales')) ){

        \App::setLocale($subdomain);

        setlocale(LC_TIME, $subdomain);

    }


    return $next($request);

}
Register this new middleware in the kernel. Open app/Http/Kernel.php file and add it as the first item:
protected $middleware = [
    \App\Http\Middleware\Language::class,
    \App\Http\Middleware\CheckForMaintenanceMode::class,
    \Illuminate\Foundation\Http\Middleware\ValidatePostSize::class,
    \App\Http\Middleware\TrimStrings::class,
    \Illuminate\Foundation\Http\Middleware\ConvertEmptyStringsToNull::class,
    \App\Http\Middleware\TrustProxies::class,
];
Add a language selector to the layout
Now let’s list the available languages on the frontend. Open the blade template where you want to put the list. In my example I’ll open resources/views/welcome.blade.php file. We load languages from the configuration dynamically, so when we’ll add new ones in the future, we need to change things in one place only.
<div class="languages">
    @foreach(config()->get('app.locales') as $code => $lang)
        <a href="http://{{$code}}.laravel.test">{{ $lang }}</a>
    @endforeach
</div>
I added some basic styling to the selector as well.
Translating strings in blade templates
Our final task is to collect and translate all the texts. There are several ways how Laravel handles the translation strings. We’re going to use the most straightforward solution: one JSON file for each (non-default) language. First create a de.json file in resources/lang folder for the german language. This is where we will store the german translation like this:
{
    "english string": "german string",
}
Now we have to go through each blade template and put all translatable strings into Laravel’s __() helper function. This function tells Laravel to retrieve the translation for that string. So in my example the following lines:
<div class="content">
    <div class="title m-b-md">Hello World</div>
    <p>This is a sample text in english language.</p>
</div>
…become:
<div class="content">
    <div class="title m-b-md">{{ __('Hello World') }}</div>
    <p>{{ __('This is a sample text in english language.') }}</p>
 </div>
Also while you’re doing this, put all those strings into the JSON file you created.
{
    "Hello World": "",
    "This is a sample text in english language.": ""
}
Note: beside blade templates you might have texts in other places, e.g.: error messages, etc. Don’t forget about them either.
Finally duplicate the de.json file and name it as es.json for the spanish translation. Then translate all texts in the JSON files. If you did everything properly, when you click on a language it should display texts in that language.

Making it live
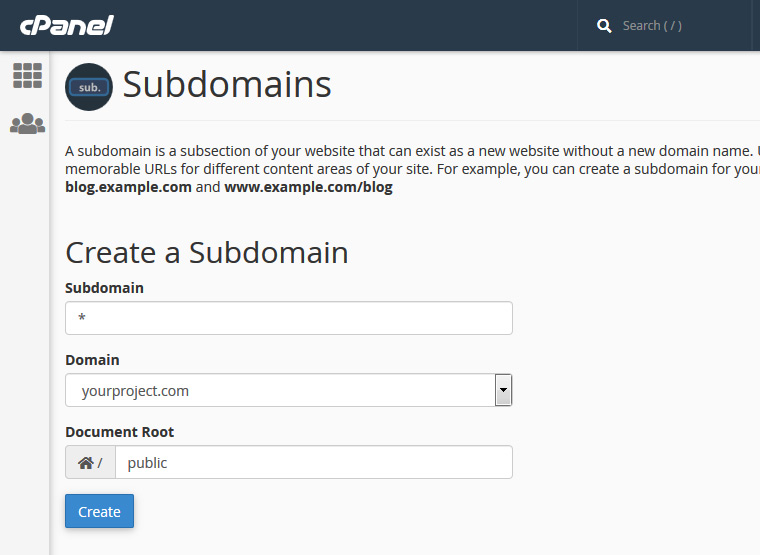
There are three key points here. One: you need to upload your Laravel project to your webserver as you’d normally do. I assume you already know how to do that. If not, following my How to upload a Laravel website to shared hosting tutorial could help.
Two: you need to configure your server to handle subdomains. I will assume that your hosting has cPanel or a similar administration interface. Just log in there, find the subdomains menu and create a wildcard subdomain (*.yourproject.com) which points to the public folder of your Laravel project.

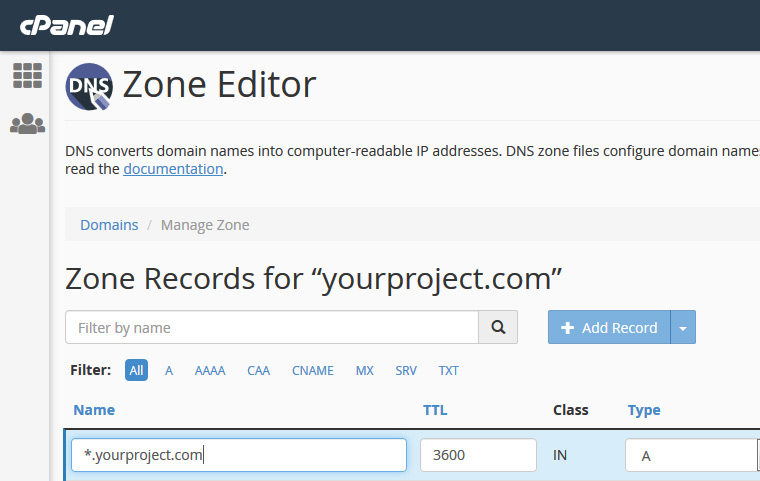
Three: make sure that you have an A record for *.yourproject.com in your DNS record which points to your server IP. Visit your domain registrar’s DNS zone editor and add a new record like this:
Name: *.yourproject.com
Type: A
TTL: 3600
Record: your server’s IP address
If you host your website at the same company where your registered your domain, then you should be able to find a DNS editor in the administration panel. In my case it’s also located in cPanel.
That’s it! Happy coding!