
Creating a complete contact form from scratch is not that easy as it seems. Input validation, email formatting, email sending, feedbacks… Luckily, Laravel makes this task easier with its built-in validation and email classes. Open your Laravel project in your favorite code editor and let’s begin!
Create a route and a controller
First we create a new route, in case you don’t have a dedicated page for the contact form yet. So when a user visits yoursite.com/contact URL, Laravel will display the contact form view. Open routes/web.php and add the route:
Route::get('/contact', 'ContactController@index');
As you can see we named our controller ContactController, so let’s make it. Open a terminal, like ConEmu, go to your Laravel project directory and run the following command:
php artisan make:controller ContactController
Now open this newly created controller file. We can find it in app/Http/Controllers folder. Define the index method and tell the app to return contact.blade.php blade template:
namespace App\Http\Controllers;

use Illuminate\Http\Request;

class ContactController extends Controller{

    public function index(){
        return view('contact');
    }

}
Create the form
Go to resources/views folder and create a new blade template, name it contact.blade.php.
If you insert this contact form into an existing project, probably you already have a blade template for the header and footer. If not, you should create them now, then open contact.blade.php and build the form:
@include ('layout.header')
<form method="POST" action="{{ action('ContactController@index') }}">
@csrf
<p>
<label for="name">Your name</label>
<input
type="text" id="name" name="name"
class="{{ $errors->has('name') ? 'invalid' : '' }}"
value="{{ old('name') }}" />
</p>
<p>
<label for="email">Your email address</label>
<input
type="email" id="email" name="email"
class="{{ $errors->has('email') ? 'invalid' : '' }}"
value="{{ old('email') }}" />
</p>
<p>
<label for="subject">Subject</label>
<input
type="text" id="subject" name="subject"
class="{{ $errors->has('subject') ? 'invalid' : '' }}"
value="{{ old('subject') }}" />
</p>
<p>
<label for="message">Message</label>
<textarea
id="message" name="message"
class="{{ $errors->has('message') ? 'invalid' : '' }}" >{{
old('message')
}}</textarea>
</p>
<p><button type="submit" class="button">SEND</button></p>
</form>
@if ($success = session('success'))
<div class="flash-success">{{ $success }}</div>
@endif
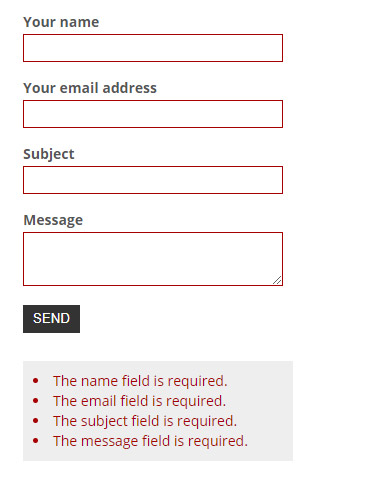
@if (count($errors))
<ul class="errors">
@foreach ($errors->all() as $error)
<li>{{ $error }}</li>
@endforeach
</ul>
@endif
@include ('layout.footer')
Here are some explanation. The action('ContactController@index') function generates an URL for the given controller action, so we don’t have to hardcode a path.
The @csrf line protects your application from cross-site request forgery attacks.
The old('fieldname') function returns the submitted field value in case of an error.
On success a flash message will be displayed below the form.
If something goes wrong, Laravel will return an $errors array. With that we highlight the incorrect fields using invalid CSS class and list errors below the form. So append these to your CSS stylings. You can also add some extra stylings to make the form look better, if it’s required.
form .invalid{
    border: 1px solid #a70000;
    color: #a70000;
}

ul.errors{
    background-color: #eee;
    padding: 10px;
    color: #a70000;
    list-style-position: inside;
    display: inline-block;
    width: 250px;
}

.flash-success{
    background-color: #eee;
    color: #08a700;
    padding: 10px;
    display: inline-block;
    width: 250px;
}
Tip: if you add a required attribute to a form field (e.g.: input, textarea), modern browsers won’t allow to submit the form while that field is empty.
Validate form data with Laravel
First we need to handle the moment when form data is submitted via POST method. Open routes/web.php and add a new route:
Route::post('/contact', 'ContactController@store');
Notice that we used post() method to handle the POST request. We also use a new store() method in our contact form controller. This will handle the validation, email sending and feedback message. Open app/Http/Controllers/ContactController.php and create it:
<?php

namespace App\Http\Controllers;

use Illuminate\Http\Request;
use App\Rules\NoHtml;

class ContactController extends Controller{

    public function index(){
        return view('contact');
    }


    public function store(Request $request){

        // validate fields
        $this->validate($request, [
            'name' => ['required', 'string', new NoHtml],
            'email' => ['required', 'email', new NoHtml],
            'subject' => ['required', 'string', new NoHtml],
            'message' => ['required', 'string', new NoHtml]
        ]);


        // redirect to contact form with message
        session()->flash('success', 'Message is sent! We will get back to you soon!');

        return redirect()->back();

    }

}
If the validation fails, Laravel redirects back to the original page with an $errors array.
On success we redirect back to the form and display a success flash message.
Notice the new NoHTML validation rule. This is our
custom rule to deny HTML and PHP tags in form input fields, since
Laravel doesn’t have a ready-to-use validation rule for this task yet.
So let’s create this new custom rule. Open a terminal, go to the
project’s root directory and run the following command:
php artisan make:rule NoHtml
A new NoHtml.php file should appear under app/Rules. Open it and modify the passes() and message() methods.
public function passes($attribute, $value){
    return strip_tags($value) === $value;
}


public function message(){
    return 'HTML tags are not allowed.';
}
Our code removes HTML and PHP tags from input with PHP’s strip_tags() function. Then it compares the stripped string with original input. If they are equal then it returns true otherwise false.
Send mail with Laravel
In Laravel we use Mailable classes for each type of email we send with our app. These are basically templates where you can configure the email’s presentation and delivery. For example you can create one for your contact form, another for order confirmation, registration, etc. These mailables are stored in app/Mail directory. Now we’ll create one for our contact form. Open a terminal, go to the project’s root directory and run the following command:
php artisan make:mail ContactFormMessage
Open app/Mail/ContactFormMessage.php and expand the build() method:
namespace App\Mail;

use Illuminate\Bus\Queueable;
use Illuminate\Mail\Mailable;
use Illuminate\Queue\SerializesModels;
use Illuminate\Contracts\Queue\ShouldQueue;
use Illuminate\Http\Request;

class ContactFormMessage extends Mailable{
    use Queueable, SerializesModels;


    public function __construct(){
        //
    }


    public function build(Request $request){

        return $this->from([
                'address' => $request->email,
                'name' => $request->name
            ])
            ->to( env('APP_ADMIN_CONTACT') )
            ->subject( 'Message from website: ' . $request->subject )
            ->view('emails.contactform')
            ->with([
                'contactName' => $request->name,
                'contactSubject' => $request->subject,
                'contactEmail' => $request->email,
                'contactMessage' => $request->message
            ]);

    }
}
Notice that we added use Illuminate\Http\Request; on the top, so we can use the POST $request variables in build() method.
In to() function we tell Laravel to use an email address from the /.env configuration file with env() function. You can also hardcode an email address here, but it’s better to define it in one place only. So open /.env and insert an email address, e.g.: [email protected]
The view() function defines that we’d like to use the emails.contactform (resources/views/emails/contactform.blade.php) blade template for our email. We will create this in the next section.
The with() function helps us to pass the submitted form values to the blade view.
Now open our controller which handles the form submission (in our case app/Http/Controllers/ContactController.php) and insert the following code in store() method after field validation and before redirect:
Mail::send( new ContactFormMessage() );
This line will send our email, using our previously created ContactFormMessage mailable class. But we need to tell Laravel where to find this and the Mail class. So add the following lines on the top, above the class definition:
use Illuminate\Support\Facades\Mail;
use App\Mail\ContactFormMessage;
Create a Laravel email template
In the previous section we referred to emails.contactform (resources/views/emails/contactform.blade.php) file as the template that should be used when rendering our email’s contents. Create this file, open it and let’s build an HTML email template from scratch.
Here are a few key tips to achieve the best results. Basically you need to code HTML like it’s 2000.
- Use old-school table layout, this is supported the most by email clients
- Use inline CSS, keep it simple, avoid: shorthands, floats, positionings and complex selectors.
- 600-800 pixels maximum width.
- Assume that images will be initially blocked by email clients, use absolute paths.
- Use basic fonts which work on all platforms, eg: Arial, Verdana, Times New Roman.
Here is an example code:
<!DOCTYPE html PUBLIC "-//W3C//DTD XHTML 1.0 Transitional//EN" "http://www.w3.org/TR/xhtml1/DTD/xhtml1-transitional.dtd">
<html xmlns="http://www.w3.org/1999/xhtml">
<head>
    <meta name="viewport" content="width=device-width, initial-scale=1.0" />
    <meta http-equiv="Content-Type" content="text/html; charset=UTF-8" />
</head>
<body style="background-color: #eee; font-family: sans-serif; font-size: 15px; line-height: 20px; color: #333333;">
    <table width="100%" cellpadding="0" cellspacing="0">
        <tr>
            <td width="100%" cellpadding="0" cellspacing="0">
                <h1 style="font-size: 20px;">A new message from contact form!</h1>
            </td>
        </tr>
        <tr>
            <td width="100%" cellpadding="0" cellspacing="0">
                <p><b>From:</b> {{ $contactName }} <i>({{ $contactEmail }})</i></p>
                <p><b>Subject:</b> {{ $contactSubject }}</p>
                <p><b>Message:</b></p>
                <p>{{ $contactMessage }}</p>
            </td>
        </tr>
        <tr>
            <td>
                <p style="color: #777777;"><i>That's it! Cheers!</i></p>
            </td>
        </tr>
    </table>
</body>
</html>
You can open this file in your browser(s) to test it or you can test it online by reading the next section.
Test email sending in Laravel
At this point you should have a working contact form, so let’s put it to a test! If you don’t want to mess with your own email, you should get a Mailtrap.io account. It’s free, simple and easy to setup. You can login with your Google or GitHub account and get started instantly! Once you’re logged in, go to your Demo inbox and check the Credentials / SMTP section.
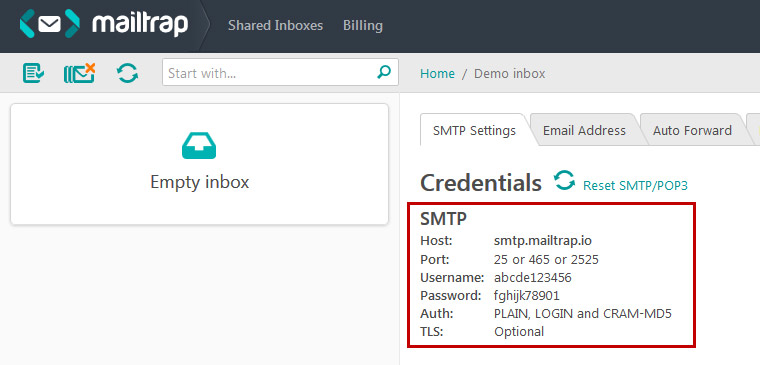
Edit your applications .env file in the root folder and insert your Mailtrap credentials.
MAIL_DRIVER=smtp
MAIL_HOST=smtp.mailtrap.io
MAIL_PORT=2525
MAIL_USERNAME=abcde123456
MAIL_PASSWORD=fghijk78901
MAIL_ENCRYPTION=null
Now send a message with your contact form. It should appear in your inbox.
Add Google reCAPTCHA to Laravel Contact Form
Now we have a working contact form, but we are not protected against SPAM bots. So let’s add Google’s reCAPTCHA! First we need to request API keys for reCAPTCHA. Visit the reCAPTCHA page and log in with your Google account. Now fill the form to register your site. Choose reCAPTCHA v2 and at the Domains section add your domain. You can add localhost or 127.0.0.1 as well.
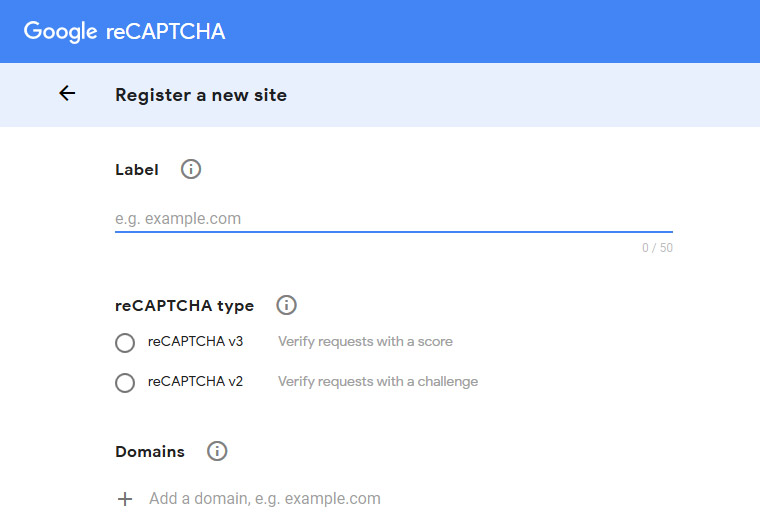
Click Submit and you should receive a Site key and a Secret key. Now insert these keys in your application’s .env file like this:
RECAPTCHA_SITE_KEY=abcd1234
RECAPTCHA_SECRET_KEY=efgh5678
Insert Google’s script in the HTML header (which is resources/views/layout/header.blade.php in my example):
<script src="https://www.google.com/recaptcha/api.js"></script>
Open resources/views/contact.blade.php and add the reCAPTCHA box with the following line, before the form’s submit button:
<p><div class="g-recaptcha" data-sitekey="{{ env('RECAPTCHA_SITE_KEY') }}"></div></p>
Now we need to tell Laravel to use reCAPTCHA in form validation process. For this we will install Guzzle, a PHP HTTP client to help us call Google’s remote verification process. Open a terminal window, go to your project’s root directory and run the following command:
composer require guzzlehttp/guzzle
Now let’s create a new validation rule. Run the following command in the terminal:
php artisan make:rule GoogleRecaptcha
Open the rule (app/Rules/GoogleRecaptcha.php), import Guzzle on the top and extend passes() and message() methods:
namespace App\Rules;

use GuzzleHttp\Client;
use Illuminate\Contracts\Validation\Rule;

class GoogleRecaptcha implements Rule{

    public function passes($attribute, $value){
        $client = new Client();
        $response = $client->post('https://www.google.com/recaptcha/api/siteverify',
            [
                'form_params' => [
                    'secret' => env('RECAPTCHA_SECRET_KEY', false),
                    'remoteip' => request()->getClientIp(),
                    'response' => $value
                ]
            ]
        );
        $body = json_decode((string)$response->getBody());
        return $body->success;
    }


    public function message(){
        return 'Are you a robot?';
    }

}
Finally, open our form controller, where we validate the form fields (app/Http/ContactController.php). Import the new rule on the top and use it in the validation section:
...
use App\Rules\GoogleRecaptcha;

...

// validate fields
$this->validate($request, [
    'name' => ['required', 'string', new NoHtml],
    'email' => ['required', 'email', new NoHtml],
    'subject' => ['required', 'string', new NoHtml],
    'message' => ['required', 'string', new NoHtml],
    'g-recaptcha-response' => ['required', new GoogleRecaptcha]
]);

...
Visit your contact form page, the reCAPTCHA box should appear and work properly.
That’s it, thank you for reading! Happy coding!