You need to change or remove a line in your WordPress theme, but don’t know how to start? This tutorial is for you! For smaller, visual fine tunings CSS is usually enough. For more serious modifications you’ll have to touch the code. This article will help you with both cases.
Small design customizations with CSS
Nowadays customizing a theme’s styling is easy with the help of your browser’s developer tools, especially in FireFox or Chrome. Just hover your mouse over the element you want to style, right click with your mouse and select Inspect Element in the floating menu. A new window will appear, where you’ll see the HTML source code in the left panel and the selected element’s CSS stylings in the right panel. Your selected element will be higlighted both in the code and the browser.
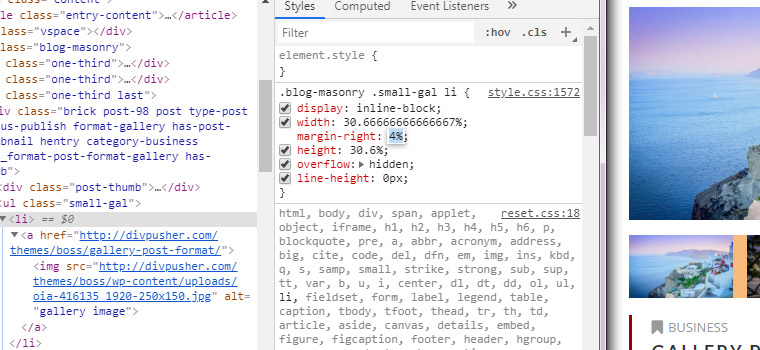
In the Styles panel you’re able to add, remove or modify CSS values and you can see these changes in real time. Important: these changes you make will NOT overwrite anything, it’s just for preview purpose. Once you have the stylings for an element, copy the code, e.g.:
.posts .post-title{
    color: red;
}
Then go to your WP admin / Appearance / Customize menu, under Additional CSS section paste the CSS code and click Publish. You should see the updated layout now.
The good thing is that changes you make here will only be applied to the currently active theme. Furthermore, if you update this theme, these stylings will remain untouched.
Deeper customizations with code
Before we begin, please note that this tutorial assumes you have at least a minimal knowledge of HTML and PHP languages. If not, we suggest you to start by learning them or hire a coder. You should also be familiar with file management locally or remotely – on your web server – via FTP.
Now grab your favorite code editor and let’s start! If you don’t have one yet, try Notepad++.
When we want to modify a WordPress theme, we never directly edit its files. Instead we use a child theme. A child theme is a theme, that inherits the look and functionality of the original, parent theme, but can be used to make modifications to any part of the theme. This way, when the parent theme is updated, your modifications are preserved.
If you purchased a premium theme, it should already have a ready-to-use child theme, usually in the package you downloaded. If you found it, copy the child theme into your WordPress site’s theme folder, e.g.: yoursite.com/wp-content/themes/. Then activate it in WordPress admin / Appearance / Themes.
Create a WordPress child theme
If there isn’t any child theme, you can create one anytime. Go to the themes folder of your WordPress install, e.g.: yoursite.com/wp-content/themes and create a new folder. It’s best practice to give a child theme the same name as the parent, but with -child added to the end. So, if your parent theme’s folder name is demo, the child theme’s name will be demo-child. Create a style.css file in the child theme with the following contents (and save it):
/*
    Theme Name: Theme Name Child
    Template: parent-theme-directory-name
    Version: 1.0.0
*/
Make sure that the Template parameter is the parent theme’s directory name, in our case: demo. Create a functions.php file and load the parent and child theme’s CSS files:
<?php

function my_theme_enqueue_styles() {

    $parent_style_handle = 'parent-style'; // change this value

    wp_enqueue_style( $parent_style_handle, get_template_directory_uri() . '/style.css' );
    wp_enqueue_style( 'child-style',
        get_stylesheet_directory_uri() . '/style.css',
        array( $parent_style_handle )
    );
}
add_action( 'wp_enqueue_scripts', 'my_theme_enqueue_styles' );

?>
We need to ensure that child theme styling will be loaded only after parent theme stylings. As you can see above, we use wp_enqueue_style() function with 3 parameters to load CSS stylesheets. The first parameter is the handle, a unique name for the style you load. The second is the complete URL to the CSS file. In the third parameter, we can set an array of registered stylesheet handles which the enqueued stylesheet depends on.
So, you will need to find the main stylesheet handle of your parent theme and insert it to $parent_style_handle. Go to your parent theme folder. Usually the main stylesheet of a theme is enqueued in the functions.php file. Open it and look for a line similar like this:
wp_enqueue_style( 'theme-name-style', get_stylesheet_uri() )
There might be more parameters. What you need is the first parameter (theme-name-style). Copy and paste it in your child theme’s functions.php file as the value of $parent_style_handle.
Note: if your parent theme uses more than one CSS file for layout stylings, you will have to add their handles to the dependency parameter as well.
Finally, activate the child theme in WP admin / Appearance / Themes.
Finding the right file
Now, let’s say you want to remove the publish date line from posts in your current theme. All you need to do is to find the file that displays the post, copy into your child theme and modify it. But how do we find it?
A WordPress theme consists of PHP, CSS, JavaScript and image files. In short, PHP generates the web pages, CSS is responsible for the visual layout and JavaScript makes interactivity possible on the frontend. We’ll need the PHP files. You should take a look at the WordPress template hierarchy to get an idea about which file you should be looking for. Sometimes there are more, sometimes there are less files in a theme. It depends on the developer’s methods. In many cases, PHP files have useful comments inside of them, describing their purpose. If you still can’t find something, you can also perform a search within the PHP files. Notepad++ has a Find in files function. Or you can use a file manager like Total Commander.
In this example, I’ll use the default Twenty Nineteen theme. Here are the list of its PHP files.
|-- classes
     class-twentynineteen-svg-icons.php
     class-twentynineteen-walker-comment.php
 |-- inc
     class-twentynineteen-walker-comment.php
     color-patterns.php
     customizer.php
     icon-functions.php
     template-functions.php
     template-tags.php
 |-- template-parts
     |-- content
         content.php
         content-excerpt.php
         content-none.php
         content-page.php
         content-single.php
     |-- footer
         footer-widgets.php
     |-- header
         entry-header.php
         site-branding.php
     |-- post
         author-bio.php
         discussion-meta.php
 404.php
 archive.php
 comments.php
 footer.php
 functions.php
 header.php
 image.php
 index.php
 page.php
 search.php
 single.php
So, we would like to remove the date from posts. First I’d open the single.php file, because this file is used to render a single post, as we learned from template hierarchy. Unfortunately, I can’t see anything date related, but I find this line:
get_template_part( 'template-parts/content/content', 'single' );
It means the theme includes the template-parts/content/content-single.php file to display post content, so let’s open that. Still nothing about dates, but there is another include for the post title section:
get_template_part( 'template-parts/header/entry', 'header' );
Open template-parts/header/entry-header.php file and there it is! A custom function is used to display the date, just comment it out and you’re done!
<?php // twentynineteen_posted_on(); ?>
I hope this article was helpful. Happy coding!